Solenoid Timings
I have noted some waterdrop photographers having trouble getting any more than one falling drop to collide with the rising jet when they are only using a single solenoid for the upper drop. There are a few factors than can have an effect on achieving multiple drops so I will try and explain…
When a solenoid is activated a magnetic field causes the plunger in the solenoid to open the port within the valve. The next drop cycle cannot commence until the current cycle has completed.
These are test photos I did using a Shako PUU220AR solenoid and each photo shows 2 drops with a 20ms duration and a varying delay duration between the 2 drops.

With the 11ms delay the 2 x 20ms drops have actually combined into a single 60ms drop because the solenoid has not been physically able to “open/close/open” quickly enough. I could have achieved same result with a single 40ms drop. (I once tested this by creating 2 drops, each 5000ms in size with an impossible 5ms delay. The solenoid remained open for 10000ms and dispensed the same amount liquid as a single 10 second activation).
Once I increased the delay and gave the solenoid adequate time for the “open/close/open/close” cycle I was able to produce 2 separate 20ms drops. (You can even see the size difference when compared to the combined drop).
You also have to factor in the size of the 2nd drop because the longer the solenoid is open to create possibly a larger drop the interval gap will continue to increase until the solenoid finally closes to complete drop 2.
In another post I demonstrated how I calculated the falling speed of a drop with my setup to be approximately 2.4mm/millisecond. In image “A” it looks like the gap between the tops of the 2 drops is 15-16mm which would seem to indicate that the delay between drops was only about half of the controllers 14ms delay. There are various factors that can have an effect on the delay such as liquid viscosity, surface tension, pressure from the drop container and nozzle size. Another factor is that the actual nozzle is filled with liquid and after the 1st drop there will actually be a drop already formed and “hanging” out of the nozzle tip. This means that it might not be necessary for the full 2nd cycle of the solenoid to make that drop fall, just the clicking of the solenoid may be enough to make the 2nd drop fall. Any of these factors could contribute to variations in the delay between drops and that is probably a good thing, as it helps add to the variety between drop collisions even when no settings are changed.
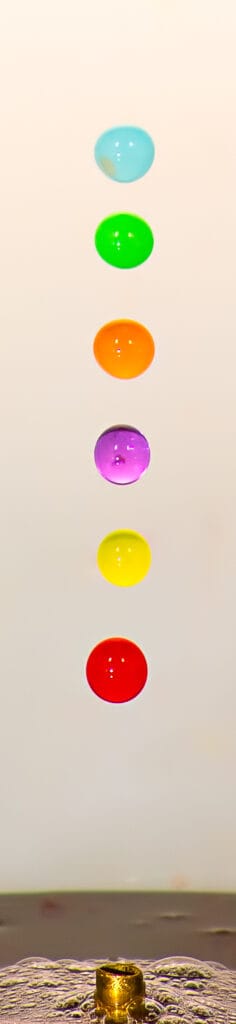
I usually use more than a single solenoid for creating falling drops so I get a lot more control on minimizing the gap between drops because each solenoid works independently and I can actually time the drops so they are either on top of one another or even alongside each other. (This demonstration image was made with 6 solenoids to demonstrate both alignment and timing).
Quite often when I am trying a new fountain nozzle I will just use a single solenoid to create the falling drops rather than setting up all my liquid tanks. In this situation my normal practice is to make the single drop big enough that it splits into 2 drops (maybe a drop size anywhere between about 50-90ms). Two different things can happen depending on the size.
As the solenoid cycles through the open duration the 1st drop will fall and then as the solenoid is still open for a few more milliseconds the next drop will quickly follow. And possibly some small drips may also be created as they are knocked from the nozzle by the impact of the solenoid closing.
Alternatively, the drop size can form 1 large drop which hangs from the nozzle for milliseconds before falling as a long drop or even a short stream. This drop can separate into multiple drops during the fall.
This technique of “splitting” a drop is important to master if you want to be able to use these drops to create a tall worthington jet. It is also used to create 2 drops very close together so that when they hit the water they produce a bubble effect. I would recommend taking the time to just do some captures of the falling drops and viewing the effect as the timings change. A few controllers have a “Delta” feature which allows you to create an automatic increment for each capture.