
I was once asked to help someone understand how to synchronise drop timings for 3 seperate nozzles. At the time, I was using a MJKZZ controller and I used this photo to help explain all the steps involved. The step by step guide ended up being probably over detailed but it was apparently helpful to the new “dropper” and maybe it will help someone else.
I have 3 different controllers and they each use different systems for creating a timeline so I have included screen shots of each controller but basically it is a similar end result.
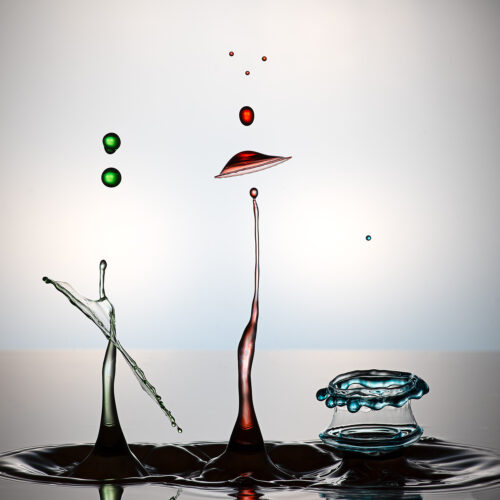
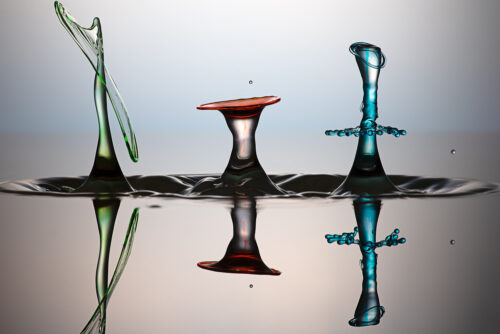
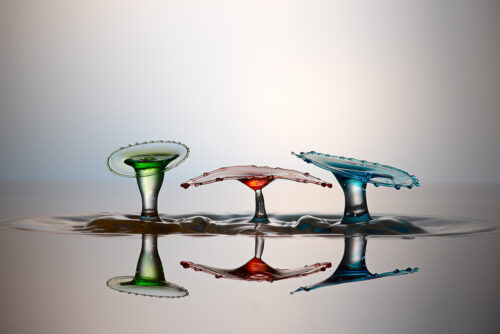
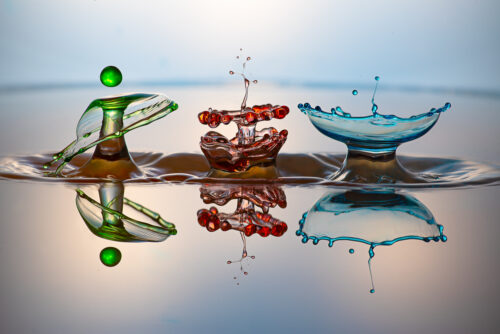
To help me to describe the adjustments made to the MJKZZ I will describe the process I would follow to capture both the green and red splash in a similar size and stage as the blue drop. My methodology may not be the same as someone else might choose to do it but it may assist someone new to the process. To help keep it simple let’s assume that each solenoid starts with the following settings:
#=3 / SYNC D0=100 / S1=40 / D1=60 / S2=30 / D2=25 / S3=20 / FD=450. Other controllers have different terminology.
For the MJKZZ “#” = Number of drops, “SYNC” = Start of timeline, “S” = Drop Size, “D” = Time before next drop an “FD” = Flash delay or end of timeline & capture time.
I start by applying a SYNC value of 100 to each valve, even though it is not necessary for the one solenoid, I always do this to make it easy to synchronise whatever timeline I choose without being tied to a particular timeline as the base reference. When I took this capture, I would have started with just one drop from each solenoid. I would have then adjusted the flash delay until one of those drops was just sitting above the surface of the water. At this stage, because there is only one drop and the flash delay remains unaltered, reducing the SYNC value would result in starting the drop timeline sooner so when the flash fires (at the same FD) the drop has been falling for longer so it will be closer to the water surface. I would have then altered the relevant SYNC values (without altering the flash delay) so that the other 2 drops were in the same position, just above the water surface.
At this stage it is worth taking a few extra captures without changing settings to confirm that you can reproduce the position of the drops every time. If you can not do this you may need to investigate your camera settings such as shutter lag, sleep or focus or even your speedlight settings.
A quick overview of the current capture and it can be seen that the green drop is obviously larger than the blue drop and that the red drop is even larger again. Firstly, I will just concentrate on the potential changes I would make to get the red splash similar to the blue splash.
First thing I might try is to reduce the delay between the 1st and 2nd drop by maybe 3ms, which should help flatten out the top similar to the blue.
I would also reduce the size of drop 3 by 5ms (S3=15), it will be trial and error to get the right amount. The other benefit of this size reduction is that the drop is going to leave the nozzle 5ms earlier so it is going to be captured closer to the flat top of the red splash because it has had the little bit of extra time to fall.
Because I have reduced delay for red drop 2 by 3ms (D1=57) and reduced the size of drop 3 by 5ms (S3=15) the timeline is going to be completed 8ms sooner. So that the final red capture still needs to coincide with the unchanged flash delay (FD=450) I will have to change my SYNC value for the red splash timeline to SYNC=108 (D0=100+8). This will bring the completion of the red drop timeline in line with the unchanged flash delay and blue drop splash.
Finally, I need to align the green splash and looking at the picture, the falling green drop could be a little smaller and the top of the splash could be flatter to achieve the reflection effect like the blue drop just sitting on top. I would try reducing drop 3 by just 1ms. (S3=17).
Following the same order I did for the red drop, I would reduce the delay between drop 1 & 2 to flatten the top. Because the green splash has more of a dish shape I will reduce the delay for green drop 2 by 4ms (D1=56).
Next, I need to get the final green drop closer to the splash. It will already be a little bit closer because it is going to start falling 4ms earlier because of the delay reduction between drops 1 & 2, but that will not be enough. A drop falls at about 2.3mm/ms so I am going to start by reducing the delay between drops 2 & 3 by 10ms. (D2=15).
For the green splash I have reduced drop 3 size by 3ms, reduced the delay between drops 1 & 2 by 4ms and between drops 2 & 3 by 10ms. Because I have reduced timeline for the green splash by 17ms, I will have to change my SYNC value for the green splash timeline to SYNC=117 (D0=100+10).
Although I have made the assumption that the time creating the drop size can be compensated with a correlated change to the “SYNC” value, in practise that time may be slightly different because of factors like the size of the residual drop “hanging” on to the nozzle and the effect that has on the next drop. My values are just to give an indication on what timings may be affected by a particular change.
The following shows before and after values:
| Number of Drops = 3 (#=3) | Flash Delay = 450 (FD=450) |
| Start Settings for Green V1: | SYNC D0=100 / S1=40 / D1=60 / S2=30 / D2=25 / S3=20 |
| Final Settings for Green V1: | SYNC D0=117 / S1=40 / D1=56 / S2=30 / D2=15 / S3=17 |
| Start Settings for Red V2: | SYNC D0=100 / S1=40 / D1=60 / S2=30 / D2=25 / S3=20 |
| Final Settings for Red V2: | SYNC D0=108 / S1=40 / D1=57 / S2=30 / D2=25 / S3=15 |
| Start Settings for Blue V3: | SYNC D0=100 / S1=40 / D1=60 / S2=30 / D2=25 / S3=20 |
| Final Settings for Blue V3: | SYNC D0=100 / S1=40 / D1=60 / S2=30 / D2=25 / S3=20 |
Using these hypothetical values, I have now brought the green and red splash in synchronisation with the unchanged flash capture of the blue splash. In theory, you could just alter the flash delay value to capture the 3 synchronised splashes at a slightly different time, but nothings that easy……


DropController Initial Settings (Valve numbers used to match colours in photo)


DropController Final Settings (Valve numbers used to match colours in photo)
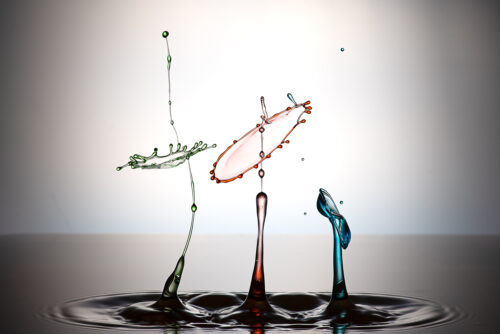
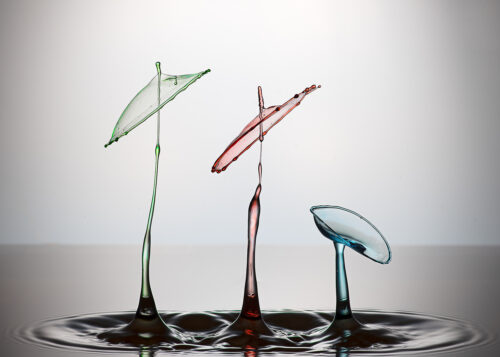
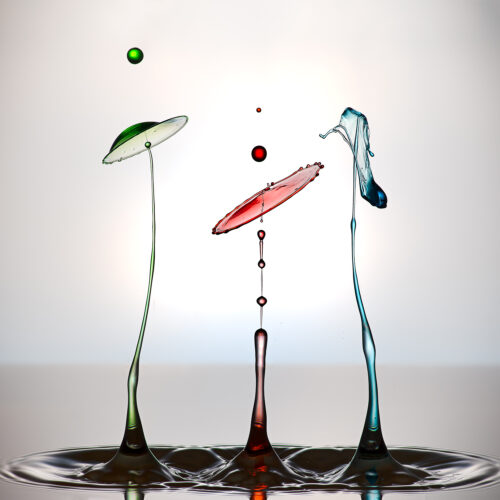
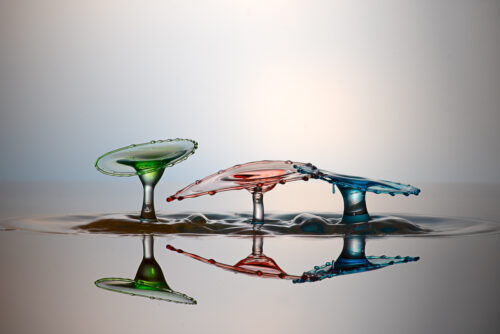
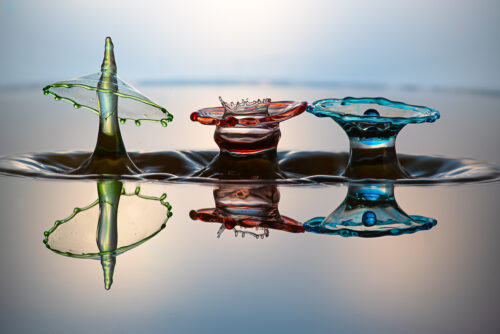
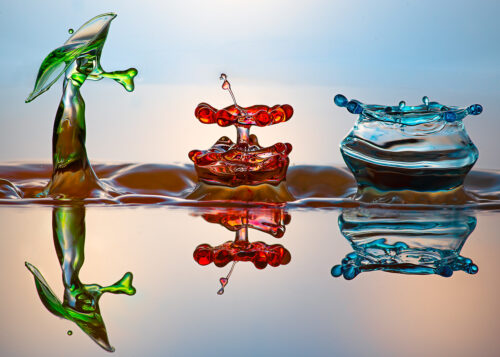
These photos demonstrate the difference just a few milliseconds can make.