I have not taken many jellyfish photos but when I have, I have enjoyed how simple they were to create. I don’t use a pressurised container of liquid, but rather, incorporate the jellyfish fountain into my existing fountain assembly. This would allow me to add some other features to the capture. Basically, my setup was a centre tube that had an air chamber at the base and it then I just used air pressure to blast the liquid up and out of the tube. I just had to top up the tube each time and I usually just added some other coloured paints on the surface.
I then decided I wanted to elaborate on the standard jellyfish by incorporating a second tube to create a jelllyfish stacked on top of another jellyfish. The first thing I did was made up a prototype by designing and printing a suitable air chamber as a base to mount 2 tubes into it and then just testing the setup.
I only did a single session of outdoor tests and I made the mistake of just using clear water in both tubes. I should have added some colour so I could easily see the formation of the 2 different jellyfish.
The tubes were approximately 21mm and 30mm inside diameter.
I then just did some low resolution, slow motion videos with my phone and I could see that it was going to work satisfactorily so my next step was to design a suitable fountain that could both incorporate my dual fountain and my existing nozzles.
It should have all been a simple process but as always, I started thinking about various additions I could make, so then began a rather large task prior to actually taking any photographs.
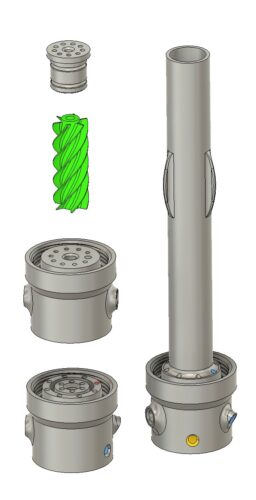
The usual fountain I use has 3 concentric chambers which can accomodate an assortment of nozzles and a centre S.F.B. tube and it was clear that I wouldn’t be able to incorporate the 2 tubes in that fountain, so I needed to design and print a new fountain assembly. (I still have so many nozzles and configurations that I had not even tried yet ). I would no longer be able to use my existing “centre” nozzles because that space would be needed for the tubes but I still wanted to use a range of “middle” and “outer” nozzles. I also wanted to use readily available PVC plumbing pipe for the tubes and chambers and basically just make the top and bottom sections to fit.

The design has a fixed 30mm tube that has a threaded collar near the base. Different bottom housings can be screwed on to suit various applications…..
– Just have the single 30mm tube with a S.F.B. tube.
– Have 30mm & 21mm tube with or without S.F.B.
– Include a spinner nozzle in inner tube.
– Use centre tube with a range of push-in nozzles.
I also added an extra outer nozzle mainly with the thought to use it for smoke effects, but it could also be used for fluids.
To use all parts of the fountain assembly requires a total of 6 solenoids.
This iPhone slow motion video is very low quality of a test but it demonstrates the effect I was trying to achieve. Unfortunately, I had equipment problems and didn’t proceed with any complete captures.
I always take slow motion videos to analyse the timings of the various parts of the fountain. I was going to then add the external fountains when I had issues with equipment so I actually didn’t get to the “taking a photo stage” which was a bit of a disappointment.
I only had a 1 millisecond delay between the 2 fountains but 2 very distinct forms are achieved.
I have since made the decision to upgrade my fountain assembly and to also re-build my water drop frame so this has ended up on the “back burner”.