
At the start of 2026 I decided to upgrade my waterdrop stand. I needed to store it away between uses (the older I get, the longer those storage times become). I decided to completely rebuild my frame using 2020 aluminium, a product I had never used before. I had previously setup my old stand on a fold-up table but I decided I wanted a solid roll-away cupboard that could support my new stand. It turned out to be a protracted project as I was continuously thinking of modifications to the yet to be used modifications! Anyway, I finally got there but unfortunately I haven’t been able to use it very much at all but hopefully that will soon change. Here are a few photos and explanations of what I have constructed….

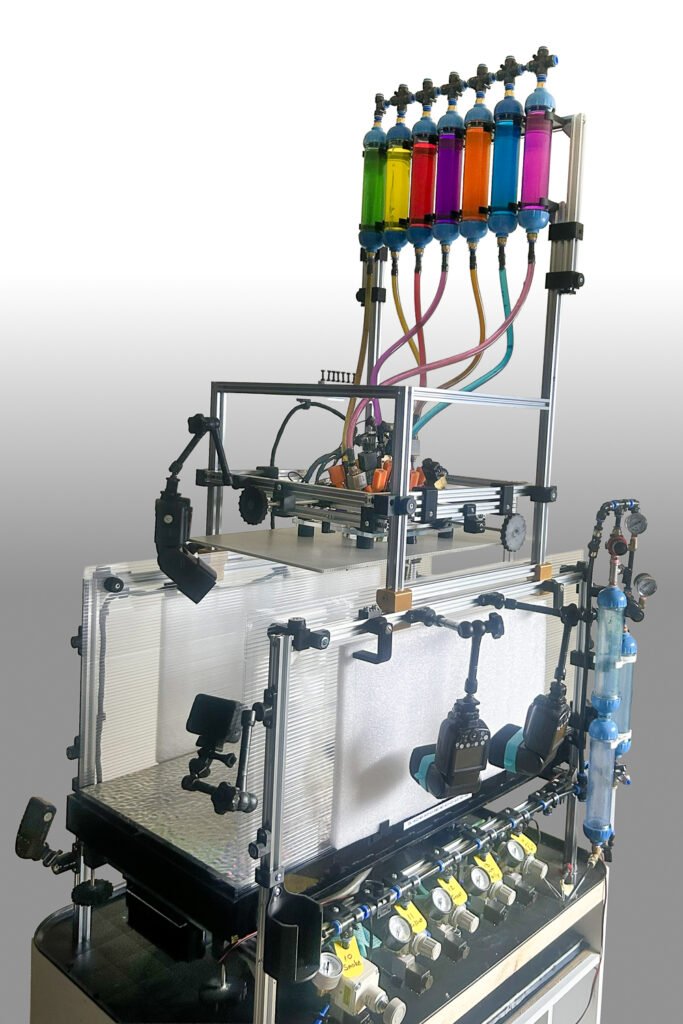
This is now my standard “go to” nozzle head. It has 7 solenoid nozzles comprising of a centre nozzle surrounded by 3 nozzles that can be finely adjusted using the spring mounted holders that the solenoids are fitted into. There is also another 3 surrounding nozzles but their adjustment is via the swivel nozzles on the underside. The whole assembly is mounted onto an acrylic plate and I am able to easily swap the whole assembly for one of the other style assemblies. One alternative assembly has just 3 spring loaded nozzles which are mounted above an iris styled shutter that opens with a pneumatic solenoid to allow me to combine water drops with other dropped objects. (visualise a strawberry hitting the water surrounded by 3 worthington jets or crowns).
Another replaceable head has 5 solenoids in a straight line and yet another has 5 nozzles fitted in position to create an olympic ring pattern.
I design the heads using quick connect pneumatic fittings so that the solenoids can be easily swapped to another head as needed.

All 7 of the nozzles are pivot style to allow for quick adjustment .
Centre nozzle is 6mm I.D., the spring loaded solenoids are 5mm I.D. and the other 3 nozzles are 4mm I.D. This helps me align all the drops to the centre without needing to pressurise the upper reservoirs.

The upper reservoirs can be pressurised if needed. Also the section that holds those reservoirs can be lowered about 200mm and this was for no other reason that I needed to be able to roll the whole stand and cupboard through a door to get it in and out of storage.
The solenoid head is mounted on an adjustable XY frame so that I can perfectly align the centre nozzle onto the lower SFB jet from the fountain. This complete XY frame can be also raised up or down depending on the amount of height I want for the falling drops. Some of the fountains can be quite high. Also on that section I have white reflective splash guard which can be easily removed for cleaning.
I have fitted clear acrylic splash guards full length on both sides of the tray. On the outer side I use white foam packing sheet to diffuse the speedlights.
I have 2 seperate SFB reservoirs. The double stacked one is simply to avoid refilling and the the single SFB reservoir will be used for a special SFB I designed that allows 2 different jets to exit from a single fountain “hole” (work in progress)
Speedlights can be moved to various mounting positions.
My fountain assembly can have 5 nozzles so there is a low pressure regulator for each nozzle chamber.
The Insta 360 camera is a recent addition to try and video some of my waterdrop creations.
It all sits on a drip stand (just in case something leaks on the underside).

I rarely use the black drop tray as a water reservoir. I prefer to use various acrylic sheets for various effects or reflection.
I use assorted devices as targets when I am aligning all my drops. The one in this photo is sitting over a tub of water and I used it to align 7 drops (one at a time) then remove it before trying to get the worthington jets to all converge.
To align the SFB jet I use adjusting knobs on each corner of the black tray.
Although not used very often, I have 5 pressurised reservoirs when I use a lower fountain assembly that creates multiple SFB jets (usually from under the water)


My waterdrop photography hobby and my desire to create my own fountains introduced me to both CAD design and 3D printing. These skills and the flexibility of 2020 profile really helped me with creating this drop stand. It is without a doubt over engineered but it was certainly fun to do.
Now, if I can drag myself away from the 3D printer perhaps I can use my new stand to use the numerous fountains and nozzles that I have designed and printed – but never used.
